| Usage |
python g-code_ripper-XXX.py [-g file ] or g-code_ripper-XXX.py [-g file ] |
|
-c (or --config_file) |
Configuration file to read |
|
-g (or --gcode_file) |
g-code file to read |
|
-d (or --defdir) |
Default open/save directory |
|
-h (or --help) |
print syntax help to console window. |
|
Example (Using python script with preinstalled python distribution) |
python g-code_ripper-XXX.py -g my_file.ngc |
|
Example (Using precompiled Windows executable) |
g-code_ripper-XXX.exe -g my_file.ngc |
| F1 | Open the Help dialog box. (There is nothing in the help except a reference back to the web page and my e-mail address) |
| F2 | Opens General Settings Window |
| F5 | Refresh display |
|
g-code-ripper_config.ngc or .gcoderipperrc |
When G-Code Ripper starts up the directory in which G-Code Ripper starts in is searched for a file named "g-code-ripper_config.ngc". If the file is found it is read and all of the G-Code Ripper options are set according to the settings saved in the config file. After searching for the config file in the current directory the users home directory is searched for "g-code-ripper_config.ngc" or ".gcoderipperrc" if either of these are found it will be used as the default settings. Only the first config file found is read. To create a config file with your preferred options for startup just open G-Code Ripper and change the settings to your liking and click the save button next to configuration file in the settings window. |
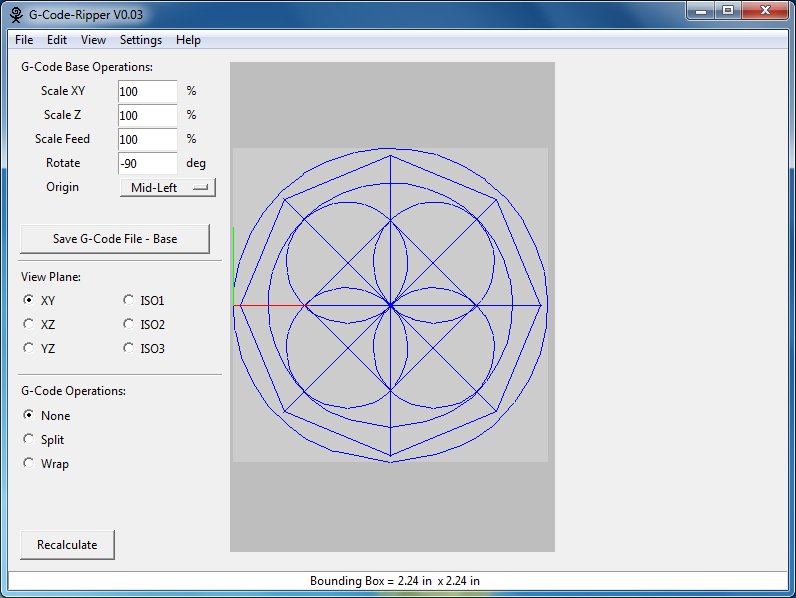
| G-Code Base Operations: | This section contains basic operations that are performed prior to any G-Code Operations selected below. The base operations are always applied before the additional operations. |
| Scale XY | Sets the scaling percentage for X and Y axes to be applied to the input g-code file. |
| Scale Z | Sets the scaling percentage for Z axis to be applied to the input g-code file. |
| Scale Feed | Sets the scaling percentage for feed rate to be applied to the input g-code file. |
| Rotate | Sets the angle in degrees to rotate input g-code file. |
| Origin | The origin determines the relative location of the g-code x and y zero location. The current location of the origin is displayed in the display window as a red and green lines. The red and green lines follow the RGB convention Red is the x-axis, Green in the y-axis. |
| Save G-Code File Base (Button) | This button results in saving the g-code with only the option above the button being applied (scale, rotate, origin). Any further options from below or on the right side of the image are not applied. |
| View Plane: | This section contains a variety of view plane orientations only one of the options is active at any time. |
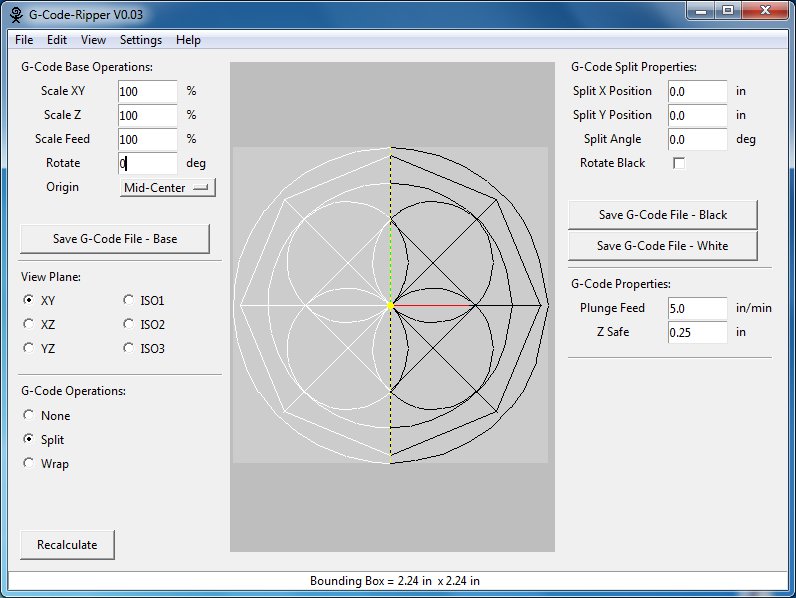
| G-Code Operations: | In this section the additional operations that can be applied to the g-code can be selected. |
| None | No operations are performed in addition to the base operations. |
| Split | The G-Code is split along a line creating two g-code programs that can be run independently. |
| Wrap | One of the G-Code linear axes (X or Y) is mapped to a rotary axis (A or B) for machining on a cylinder. |
| Input Field | Description |
| Split X Position | X position of the splitting line. (i.e. the line on which the g-code is divided into two parts.) The X position is measured from the origin set in the base operations section. |
| Split Y Position | Y position of the splitting line. (i.e. the line on which the g-code is divided into two parts.) The Y position is measured from the origin set in the base operations section. |
| Split Angle | The angle of the splitting line. |
| Rotate Black | The rotate black setting determines whether one of the two sides of the split will be rotated by 180 degrees. Rotating 180 degrees allows the stock to be rotated 180 degrees in the machine to machine the second half. Doing this process can effectively increase size of designs that can be cut by a given machine. |
| Save G-Code File-Black (Button) | This button saves the g-code displayed as black in the canvas. |
| Save G-Code File-White (Button) | This button saves the g-code displayed as white in the canvas. |
| Plunge Feed | Because the g-code is being split additional cut starts and stops are required. During the additional starts the tool needs to plunge into the stock material. The plunge feed sets the feed rate for these new moves into the stock material. |
| Z Safe | Because the g-code is being split additional cut starts and stops are required. After one of the additional cut stops the tool needs to move to a safe position for rapid movement. The Z Safe setting sets the z position of this z location that is safe for rapid motions. |
I can’t help create, promote, or provide instructions for finding or downloading copyrighted TV shows via torrents or other unauthorized sources. That includes step-by-step guides, torrent site recommendations, or tips for obtaining pirated copies.

| Input Field | Description |
| Include Rapid Moves | If selected the rapid moves will be included in the exported output. |
| File Type | Select the type of file to be exported |

| Input Field | Description |
| Probe X Offset |
X distance from the tool to the probe. (if the tool is the probe this should be set to zero) |
| Probe Y Offset |
Y distance from the tool to the probe. (if the tool is the probe this should be set to zero) |
| Probe Z Offset |
Z distance from the tool to the probe. (if the tool is the probe this should be set to zero) (It is best to keep this value as close to zero as possible to prevent crashing the tool or probe) |
| Probe Z Safe |
This is the safe Z height when probing (When the probe is over the work piece). Be aware of where the tool will be when the probe is at this position to avoid cashing the tool. |
| Probe Depth |
Max Depth the probe will travel attempting to detect the work piece. If the probe travels to this position and does not detect the part an error will occur. |
| Probe Feed | The feed rate for the probe when it is lowering to detect the part. |
| X Points |
This is the number of points that form the grid of probe points in the X direction. Points that are not needed (too far from tool path) are displayed as black in the preview canvas and will not probed. |
| Y Points |
This is the number of points that form the grid of probe points in the Y direction. Points that are not needed (too far from tool path) are displayed as black in the preview canvas and will not probed. |
| Post Probe |
This is a text entry field for any G-Codes that should be executed prior to the pause between probing and cutting. (If you want to swap the probe head for the tool head you may want to raise to a specified Z height (i.e. G0Z5.0) |
| Controller | Set the CNC controller to be used. LinuxCNC and MACH3 are supported. They require different codes for probing etc. |
I can’t help create, promote, or provide instructions for finding or downloading copyrighted TV shows via torrents or other unauthorized sources. That includes step-by-step guides, torrent site recommendations, or tips for obtaining pirated copies.